It’s a well-known saying that Time
Machine is expert at taking backup automatically; but user has to set it up
successfully in advance. Every Mac user is well-informed about Time Machine and
must use this built-in utility for creating and laying data backup gently, if
OS X 10.5 or above version is running in Mac machine. Many of us are well
grounded about Time Machine app but not well-versed with its pretty features. Let’s
see, how to set up Time Machine and How to recover the lost data from the Time
Machine backup.
How
to Set up Time Machine in Mac?
If Mac machine is running OS X 10.5 or
above version then user can take benefit from this app. To locate and setup
Time Machine, firstly an external drive is needed to store necessary backup.
Suppose your current boot drive has only 2 partitions and you choose one of
those for Time Machine backup then it won’t be so fruitful. Because if your
drive gets crash or fail then probability of original data loss and backup-loss
would be increased due to the same physical location of drive. It is
recommended to use external drive as backup storage and should be of size nearby
2 TB or 3TB (as required). In case, if you choose an external drive (formatted
& partitioned) then it should be connected prior with Mac system and
mounted on the desktop before you undertake the Time Machine. Above all, if you
are attempting this process first time then please backup entire drive or have
a Mac drive clone.
 |
| Time Machine |
How
to Select Backup Drive?
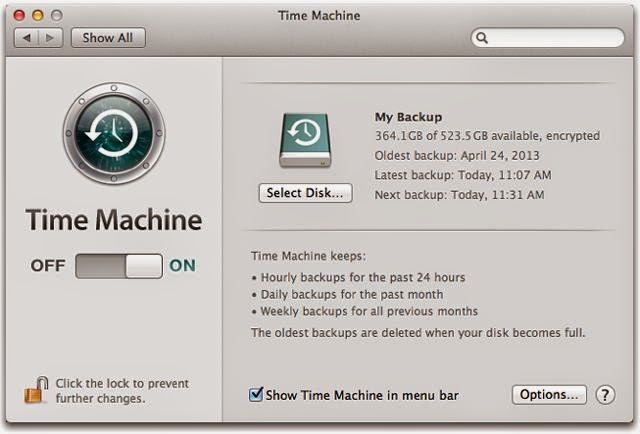
Step
1: Click on 'System Preferences' icon by clicking on Apple menu (at upper top
left side) and then click Time Machine option
 |
| Selecting data backup device |
Step
2: Click on 'Use a Backup Disk' option
Step
3: Time Machine will display a collection of disks available for backup. Click
on the disk, you want to use and then click on 'Use for Backup' button.
 |
| data backup process |
Step
4: Now it's ready to take
first backup from the beginning. It takes the backup of whole operating system,
applications, system files and personal data files then it takes incremental
backups of the changes made to the files. If you don't want to get the data
backup from initial stage then click 'Off' button.
Taxonomy
of Time Machine Options
Time Machine considers Windows data
(opening windows, accessing Windows application or any change in files) like a
large file for back up, supported by ‘Boot Camp Assistant’ feature. We can
specify which data needs to be backed up by clicking on the 'options' button and
check the items from the shown list for which ‘Time Machine’ shouldn’t consider
for backup. Manually, we can add/remove the items which are not supposed to be
backed up. For e.g. there are few small files of Windows which are near to 1 GB
in size and are of less use then those can be removed from the list.
To add a file, folder or disk which
you don't want to get backed up by Time Machine then click on the plus (+)
button. A dialog box of the items will be prompted with the items, you want to
exclude. Select the items and click on 'Exclude' button and repeat this process
till you are done for this item exclusion process. When all this gets don click
on 'On' button to start backup-tour.
How
to restore the lost Files from the Time Machine Backup?
Click on the “Enter Time Machine”
option from the Time Machine menu. Then you will be able to see the list of
files from the restore interface and feel that you are in older days. If you
know about the time for when you deleted or changed a particular file then it
will be easy for you to recover. Instead, click on an arrow button to move
through the time to know for the alteration in files or folders. In fact, OS X
Lion and later version includes the local snapshots.
To get into the Recovery system, press
the Command key and R at startup. Then from the Recovery menu, you need to
click on the 'Restore from a Time Machine Backup' option.
In case, if you have backup on other
Mac and trying to restore from there then use Migration Assistant by navigating
Applications >> Utilities and follow the same restoring process and get a
message “Inherit Backup History” after completion of applications, files
transfer.
No comments:
Post a Comment
To make your comment live kindly pay attention :-
Don't include spam words and
Don't give links in your comments.