Friday 26 July 2013

Bootable backup strategy and other methods for protecting Mac data


A good backup strategy for data protection includes backing up data at regular intervals of time. Clone is a bootable backup method that is recommended mostly during transferring data or migrating apps from one drive to another. In all the cases of drive failure or crash the only solution is to have cloned drive.
After a lot of researches I came to know that there are mainly four methods to protect your data, which can be used by you individually or in conjunction with each other. The first safety method is normal backup routine; we all are generally familiar with the process and its advantages. However, three other methods are: - 

1. File synchronization.
2. Mac drive image method.
3. Create bootable Mac drive clone


Each method serves a different purpose, but all approaches will assist in same direction of protecting your Mac data by taking essential measures.
Normal Backup Routine of Mac volume/folder
For implementing normal backup routines in Mac drive, one should schedule time machine to take incremental backup of some important data including some volume or folder. Backup locations can be on secondary hard drives, on external drives or on network drive etc. Backing up your data to several locations protects the data even more efficiently by decreasing risk of losing data.
File Synchronization between two Mac
The file and folder synchronization can also be used as a data protection method. In synchronization process files and folders of one computer (primary machine) are duplicated on another machine. For example, your office desktop computer can be synchronized with your laptop. So, when the sync app is running, the most recently edited and saved files are stored or get updated on each computer. The advantage of the process is observed when one computer crashes but one can continue his/her work on the other computer. When your damaged machine is repaired or replaced, the files and folders can again get synchronized.
Mac Image Backup
This function is inbuilt in Mac OS X 10.3 later versions of OS X. Many other third party utilities can also perform this function. Basically, a system image is a copy of all the contents lying on hard drive. You need to create system image less frequently than backup of drive. Imaging of drive should be done in following scenario:
  • When you install new software make any other significant changes in your drive.
Image backup of your disk can be stored on an external drive. One can restore his image backup when needed.
There are many cloning and imaging applications to do the job effortlessly and efficiently. I clone and image my Mac using Stellar Drive Clone application. I find it reasonable, effective, fast and easy to operate. After comparing the features with its competitors I decide to spend money on it and I observe that it is worthy enough. So, I will recommend Stellar Drive Clone software for Mac users. This software does not create incremental backup, which is the only lacking feature. As we know, Time machine works on incremental backups however Stellar drive clone can perform imaging and bootable cloning on your drive, volume and folder to any external drive, USB, DVD, network drive in few simple clicks.
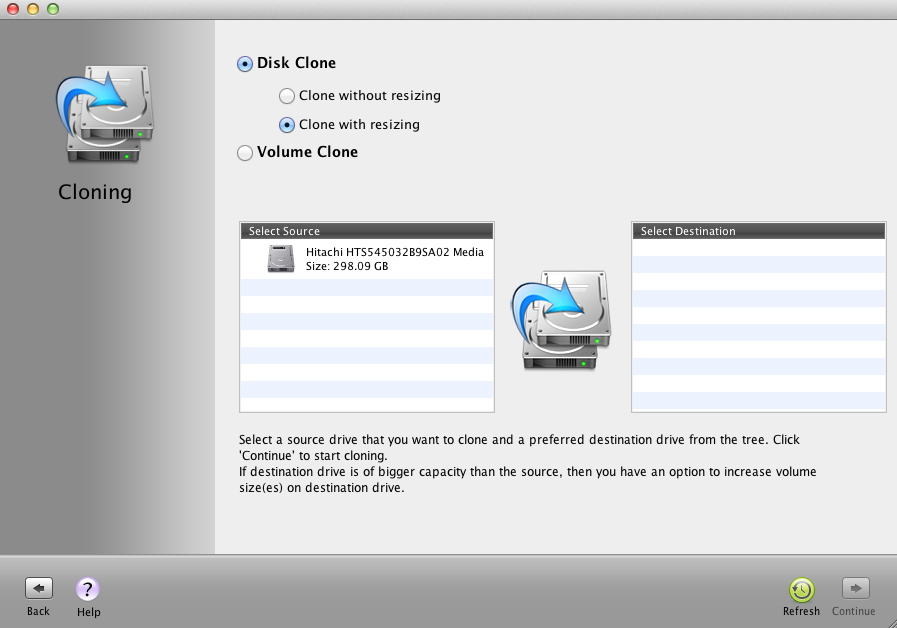
Create Bootable Clone Drive
A bootable clone of your entire drive copies all of your data, bit by bit, and places it on destination drive. This method is useful in case of migration apps from one drive to another or if your drive fails or corrupts. If your drive fails then it is not necessary to do fresh installation. You can replace the damaged drive by the clone drive and your system will be back in service. You can continue your work while cloning is in progress.


Thursday 18 July 2013

Why Stellar Drive Clone is most recommended software for cloning your Mac drive


In this article, I am going to explain how Stellar Drive clone software proved to be the most useful and worthy Mac cloning application. How it tackles with different Mac cloning and imaging cases that are usually faced by Mac users. So, here I will explain some common cloning scenarios one by one where this application use is required. 
 
When you want to clone your entire Mac drive to a new drive or machine:

There could be many reasons to create an exact clone of your Mac drive. Suppose your machine get damaged and you need to send it for repair. Now, you need to borrow another machine for the duration of repair and probably you also require some of your data and applications on it so that you can do your work easily in the meantime. If you don't have any backup clone copy of your data, apps saved in some external drive then it is must for you to backup your drive (if drive can be backed up) before sending it to repair. Because, there is a possibility to lose your all data and programs during its repair. But, in most of the cases data is lost during drive crash & failure that is why it is recommended to take clone of drive regularly.

So, the lack- of awareness of not keeping cloned copy of your drive in some external drive can do a big harm to your business. A failure or crash can happen anytime and it can corrupt your entire data forever. Apple also recommends to create a copy of your drive on weekly basis and also to take backup of your all important data because disaster can strike anytime. If your drive is running, you should take clone of it in before sending it to repair. Because, it is recommended by Apple to create clone as technician are not responsible for your data.

If you have clone of your Mac drive you need not to worry for your data, applications and OS. As cloneMac hard drive using this software gives bootable clone. You can boot clone of your original Mac drive onto borrowed machine . This cloned copy works exactly same as your primary drive which means the cloned applications work without the need of reinstallation.
 
Thus, clone of your Mac disk will give you exactly the same environment as you experienced on your actual machine.


To create a complete, simple clone of entire Mac drive using Stellar Drive Clone:
  1. Launch Stellar Drive Clone
  2. Window showing two icons one for cloning and other for imaging. After, selecting cloning, it gives another interface showing option 'disk clone' and 'volume clone'.
  3. Here, you can select according to your need, if you want a bootable clone than select the drive or volume having OS.
  4. Choose the drive/volume of which you want to create clone from the left hand Source menu.
  5. Choose a destination drive/volume after formating it from disk utility.
  6. Select "Continue" in the bottom right corner.

You can also perform testing of some applications on your clone drive before installing them on your primary drive to check whether these are required one or not. 
 

When you want to run clone of your old drive to new Mac machine


This scenario comes in action when you want to switch to some other model of Mac like from iMac to Mac mini or from Mac mini to Mac pro etc. So, in these circumstances you need to transfer your entire data to your new drive. Therefore, you have to create clone of entire drive in order to move everything from your old Mac machine to your new Mac. 
 
Same architecture is required for running clone of your old drive into new Mac machine. The reason is unique MAC Adresses of every machine. For example,windows os has three MAC addresses so that one can't run the same os on many computer. 
 
So, cloning your old Mac onto new Mac won't work on different Mac models. Due to this limitation, we recommend to use Migration Assistant application to migrate content from your old Mac to a new Mac machine. You can migrate data either directly from Mac drive installed in your old Mac. After performing transfer of user accounts, applications using Migration Assistant, you can create backup or clone copy of your Mac drive/volume using Stellar Drive Clone software.

But, keeping clone copy of your primary drive helps in case of drive failure or crash. In this case, you can migrate backup or clone copy of your data to another drive or Mac. 
 

"I bought a Mac that's newer than my old Mac machine, but not brand-new. Can I use Stellar Drive Clone to clone my older Mac to this Mac?"


If your old Mac architecture is same as the newer Mac (e.g. Intel or PowerPC), then you will be succeed in booting your new Mac using clone of old Mac drive. But, before migrating to newer Mac, make sure to update your older Mac to atleast one release that come with your newer Mac.
One should determine that whether clone of your older Mac is working on newer Mac easily or not.

  1. If your both old and new Mac have Firewire ports, boot your older Mac drive into 'Target Disk Mode' by holding down the "T" key on startup.
  2. Then with the help of Firewire cable, attach your old Mac disk to your new Mac. If not, attach a clone of your old Mac to your new Mac drive with a Firewire or USB cable.
  3. On the newer Mac, open the preference pane from System Preferences and select the old Mac's as the startup disk, then click the Restart button. 
     
If your newer Mac booted from old Mac OS X installation , then launch Stellar Drive Clone and clone the older Mac's disk(selecting as source drive) to the newer Mac's internal hard drive as the destination.

By this way you can troubleshoot and perform various tasks using clone of your Mac drive keeping data secure and protected all the time. Stellar drive clone works as cloning, backup and imaging application for Mac. It can clone your Mountain lion+ Recovery HD also and supports ExFat, FAT32, MBR formats. This application not only creates bootable clone but image of your Mac disk and volume using which one can restore his Mac backup.

Monday 8 July 2013

How to create a Clone of your Mac OS X in an easy and effective way


With increase in the number of users of Mac OS X, consciousness for data protection has also been increased. Mac OS X cloning and imaging are two useful modes for protecting your data stored on Mac volume. Practically, clone of a thing means an exact replica or a mirror image. Yes, like human or animal clones, you can also create clone of your hard drive. Having clone of your hard drive overcome(s) the data loss situations. So, it protects your data by keeping backup of your entire drive including system files.

If you are planning to clone your Mac drive, then you must need an application for it. Are you aware of some reliable Mac cloning and imaging applications? Well, Mac OS X itself has an in-built Disk Utility application that is able to perform various tasks. These tasks include imaging of drive , individual volumes , create/delete a volume, verifying & repairing disk permissions, clone Mac volumes, resize existing volumes and even restore Mac drive image. If we attempt to clone a volume of Mac drive, it creates an exact carbon copy of our selected volume.

Using Disk Utility application of Mac, you can even create a bootable clone of your Mac disk onto another drive. Only you need to be sure that your destination drive should be equal to or larger than the source drive. You can use this cloned drive as an alternative to original drive when it fails. Here,you can go through the step-by-step process of cloning a Mac volume (containing your precious data) using disk utility:

  • Launch Disk Utility on the desktop or click Go -­-­-­-> select Applications menu -­-­-­-> open Utilities -­-­-­-> open Disk Utility.
  • Select the target Mac volume(destination volume) in the left hand pane of Disk Utility window.
  • Go to the 'Restore tab' in the right hand pane of disk utility.
  • Drag and drop the destination Mac volume to the Source field.
  • Now, drag and drop the destination Mac volume to the destination field. Recheck in order to ensure that you have chosen the correct source and destination volumes.
  • Click 'Restore button' to start cloning process.

After the completion of cloning process, you can see a carbon copy of your selected source Mac volume at the destination drive. But, being free it is not so efficient in comparison with outside (third party)products of cloning&imaging. I have heard many complaints from Mac users about Disk Utility’ complications. Therefore, it is advisable to use easy and reliable application for cloning and imaging your Mac drive.

So, to avoid any unfavorable situation or complexity, it is recommended to use a third party Mac cloning software. Now, the question arises that what are the features that should be in a good Mac cloning tool. Following are some required features:-

  • Easy to use interface.
  • Clone selected drive/volume/folder and also recovery HD (lion+)
  • Able to work on various file formats like MBR, FAT32, Exfat etc.
  • Support to SSD (Solid State Drive)
  • Cloning to network drive(destination drive).
You can also create clone of your hard disk using ‘Restore’ feature of ‘Disk Utility’. However, if one want more robust, easy and advance Mac cloning method, then one can try a third party application. Let us understand this scenario with a practical example.

Jasmine – a college student wants to replace her old Mac drive with SSD. However, before doing replacement of the drive, she wants to clone Mac drive, so that its settings, preferences, and applications remain the same. Instead of using her machine ‘Disk Utility’ for creating clone, she wants to use some reliable Mac cloning software as she heard that some of them are much robust and efficient.

For selecting the better one, she) searched over the internet and found some great professional Mac cloning utilities available. After going through various reviews, forums, blogs, articles, and websites, she found one tool (Stellar Drive Clone) which was recommended by most of the users. However, to check its efficiency , first she downloaded the free demo version to see the options available in the application.

features Available in Demo Version of Stellar Drive Clone:
1. Restore volume from folder
2. Restore volume from volume image file
3. Create clone to network
4. Create clone to folder

However, in order to experience all of its features and functions, you have to purchase the license of this application. Therefore, for enabling all the features , she bought the license and easily create clone and image of her Mac drive and volumes on any external drive.

Now, before replacing her hard drive with new SSD, she created clone using this tool and checked this clone on her machine and it was working exactly the same as old machine.
In the same way, as Jasmine create clone of her Mac drive to SSD, you too can create an easy,fast and reliable clone backup of your drive to an external drive. Good part of this application is that it runs in a background. One can perform cloning and continue work at the same time. This tool has really a simple, interactive and easy to use interface.

Friday 5 July 2013

Clone your Mac OS X 10.8 Drive with Stellar Drive Clone


As per my experience of working in the IT industry, I have learned that we must have a reliable backup strategy in order to protect our precious data. Imagine a situation, when you are trying to restore something from your single backup copy having all of your files and applications and suddenly it got corrupt.

Actually such situation has already happened with me. When I tried to restore my files from my time machine backup, it failed. I was not able to restore because there was a problem with one backup file.

Today, with time machine and many third party software availability, backup methods are easier to understand and process so we should develop and implement these backup methods in our daily routine. No matter, whether you are in business, working in an IT industry, or a home user, everyone should follow the habit of backing up his data in order to keep data on safe side.

As in the title of this post I have mentioned software Stellar Drive Clone – it is the recommended Mac cloning and backup application I have tried in my Mac mini. 
 
The purpose of this blog post is to give details of cloning Mac drive using Mac Time machine and Stellar Drive Clone application.
In the past, I have gone through other Mac cloning software also so, as per my experience I will recommend Stellar Drive Clone as your secondary backup solution. 
 

Steps to clone your Mac OS X10.8 drive using Stellar Drive Clone

Requirements: An external hard drive of equal or greater size to the drive you wish to clone.

Processor:Intel, PowerPC (G3 or later)
  • Operating System: Mac OS X 10.3 or later.
  • Memory: 256 MB RAM
  • Hard Disk: 25 MB of free space
Steps:-
  1. Download Stellar Drive Clone (Found here: http://www.stellarclonedrive.com/download-free-mac-drive-clone.php
  2. Open the “stellardriveclone.dmg” file and drag the file to “Applications” folder.
  3. Connect an external drive to your Mac.
  4. Open “Disk Utility” Application. (located in /Applications/Utilities/Disk Utility app).
  5. Format your external hard drive.NOTE: Use the “Mac OS Extended (Journaled, Encrypted)” format to encrypt your drive in order to give it password you provide. If you do not need encrypted backup then you can go for “Mac OS Extended (Journaled)” format.


Features provided by Stellar Drive Clone in demo version:
1. Restore volume image from folder
2. Restore volume from volume image file
3. Clone your Mac to network
Clone to folder
For taking advantage of all features you should purchase its full version.
Features provide in Full Version

1. Create Bootable DVD
2. Minimal System (quick bootable clone including only default Mac files)
3. Imaging Mac drive,volume
4. Disk Clone and Clone to volume
5. Support windows file formats in Mac

Stellar drive clone starts with two options 'Cloning' and 'imaging' with three buttons at the top: Clone and Imaging, restore and tools.

One can click as per the requirement whether wants to create clone or image of Mac drive/volume.
Select the drive you want to clone as source drive and destination drive and then click continue.
How to take backup of your OS X 10.8 Drive with Time Machine

Requirements: An external drive larger than the size of the drive you wish to backup.

  1. Connect your external hard drive to your Mac.
  2. Open the “Disk Utility” Application. (located in Applications/Utilities/Disk Utility).
  3. Format/Erase your external drive.
Now, Open the “Time Machine” Application. (located in /Applications/System Preferences).
1.Specify your desired backup location by clicking the “Select Backup Disk” button on ots interface.
2.Select the external disk to be used as destination backup drive by Time Machine.
3.You can schedule your backups like hourly,daily, weekly routines as per your requirement.
4. If you want to keep secure backups, then you can use file vault further for encrypting your backups.