As
per my experience of working in the IT industry, I have learned that
we must have a reliable backup strategy in order to protect our
precious data. Imagine a situation, when you are trying to restore
something from your single backup copy having all of your files and
applications and suddenly it got corrupt.
Actually
such situation has already happened with me. When I tried to restore
my files from my time machine backup, it failed. I was not able to
restore because there was a problem with one backup file.
Today,
with time machine and many third party software availability, backup
methods are easier to understand and process so we should develop and
implement these backup methods in our daily routine. No matter,
whether you are in business, working in an IT industry, or a home
user, everyone should follow the habit of backing up his data in
order to keep data on safe side.
As
in the title of this post I have mentioned software Stellar
Drive Clone – it is the recommended Mac cloning and backup
application I have tried in my Mac mini.
The purpose
of this blog post is to give details of cloning Mac drive using Mac
Time machine and Stellar Drive Clone application.
In the past,
I have gone through other Mac cloning software also so, as per my
experience I will recommend Stellar Drive Clone as your secondary
backup solution.
Steps to clone your Mac OS X10.8 drive using Stellar Drive Clone
Requirements: An external hard drive of equal or greater size to the drive you wish to clone.
Processor:Intel,
PowerPC (G3 or later)
- Operating System: Mac OS X 10.3 or later.
- Memory: 256 MB RAM
- Hard Disk: 25 MB of free space
Steps:-
- Download Stellar Drive Clone (Found here: http://www.stellarclonedrive.com/download-free-mac-drive-clone.php
- Open the “stellardriveclone.dmg” file and drag the file to “Applications” folder.
- Connect an external drive to your Mac.
- Open “Disk Utility” Application. (located in /Applications/Utilities/Disk Utility app).
- Format your external hard drive.NOTE: Use the “Mac OS Extended (Journaled, Encrypted)” format to encrypt your drive in order to give it password you provide. If you do not need encrypted backup then you can go for “Mac OS Extended (Journaled)” format.
Features
provided by Stellar Drive Clone in demo version:
1. Restore
volume image from folder
2. Restore
volume from volume image file
3. Clone your
Mac to network
Clone
to folder
For
taking advantage of all features you should purchase its full
version.
Features
provide in Full Version
1.
Create Bootable DVD
2.
Minimal System (quick bootable clone including only default Mac
files)
3.
Imaging Mac drive,volume
4.
Disk Clone and Clone
to volume
5.
Support windows file formats in Mac
Stellar
drive clone starts
with two options 'Cloning' and 'imaging' with three buttons at the
top: Clone and Imaging, restore and tools.
One
can click as per the requirement whether wants to create clone or
image of Mac drive/volume.
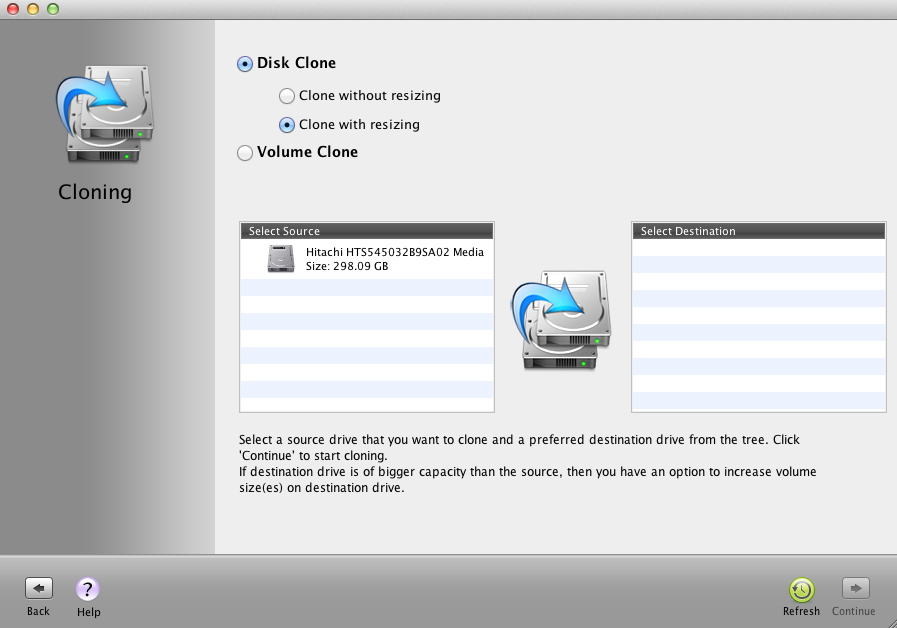
Select
the drive you want to clone as source drive and destination drive and
then click continue.


How
to take backup of your OS X 10.8 Drive with Time Machine
Requirements: An external drive larger than the size of the drive you wish to backup.
- Connect your external hard drive to your Mac.
- Open the “Disk Utility” Application. (located in Applications/Utilities/Disk Utility).
- Format/Erase your external drive.
Now,
Open the
“Time Machine” Application.
(located in /Applications/System Preferences).
1.Specify
your desired backup location by clicking the “Select Backup Disk”
button on ots interface.
2.Select
the external disk to be used as destination backup drive by Time
Machine.
3.You
can schedule your backups like hourly,daily, weekly routines as per
your requirement.
4.
If you want to keep secure backups, then you can use file vault
further for encrypting your backups.
No comments:
Post a Comment
To make your comment live kindly pay attention :-
Don't include spam words and
Don't give links in your comments.