Mac
machine are the best and most demanding machines especially from
business perspective. Although these machines are expensive and more
advance but one cannot avoid situation of hard drive failure or
crash.
You can use your Mac boot volume image to restore Mac with Disk Utility or tool like Stellar Drive clone.Follow the steps discussed below:
So,
what one can do is to have proper back up of their precious documents
instead of blaming technology or failed drive. Situations like
improper shutdown, power failure resulting in data loss. There are
two methods of backup data: Cloning and Imaging.
Clone is an
exact copy of your drive/volume that provides you bootable backup.
While imaging is replica of drive including its contents, structure
etc. Imaging is always beneficial in hard drive failure scenarios, as
you can restore it when needed. Mac OS X has an inbuilt backup tool
i.e. Time Machine. It can create incremental backups (if configured
can also perform backup at hour-basis).
However,
imaging is less time consuming process as compared to cloning. Larger
the size of your boot volume longer it will take to create image.
But, time machine can't perform imaging of your Mac drive. So, to
overcome it, Apple provides us Disk Utility in Mac as a free
inbuilt tool with many features.
Using
disk utility you can create image of your boot volume and can boot
Mac using this image.
Creating
image using disk utility application as folows:-
Imaging
a Mac volume refers to the process of replicating the structure,
contents of that volume. A file generates in imaging process with
.dmg extension contains complete data of the selected volume.
Basically,
imaging is nothing but a process of taking snapshots of the source
volume/disk.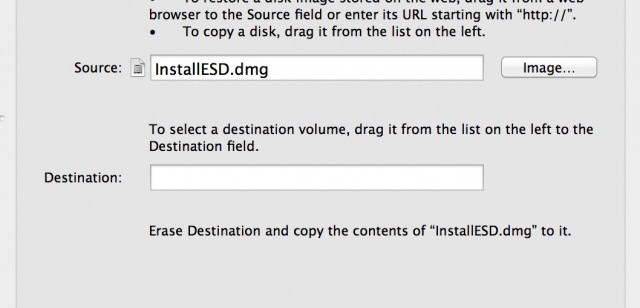
So, you can
create image of any volume including your Mac boot volume. One can
restore his image of boot volume in case of drive failure or crash.
You can even boot multiple (similar architecture) Mac machines using
this image (.dmg) file without having the need to reinstall or
reformat OS X.
Now, one must
know how to create image using disk utility. So, below are simple
steps of imaging a Mac boot volume using Disk utility.
Steps to Create Image of Boot Volume in Mac using Disk Utility:
- Attach an external hard drive to Mac having storage capacity atleast equal or larger and let it mount.
- Launch Disk Utility or follow Go ---> Applications ---> Utility ‑--> Disk Utility.
- Select boot volume from left hand pane of disk utility.
- Now, on ‘First Aid’ tab, click Verify Disk.
- If it shows any error, click ‘Repair Disk’ to fix them.
- Now, click 'New Image' option from the menu bar.
- Now, either specify the destination location to save this image (.dmg) file in the left most pane of disk utility window or create a new folder at this location.
- Click 'Save' to start the imaging process.
- Click on ‘Images’ menu and then select ‘Scan Image for Restore’.
- Exit Disk Utility and restart the Mac.
Practically,
imaging technique comes in action for avoiding data loss situation
due to drive failure,volume corruption, accidental deletion of data,
inaccessibility etc. Apart from Disk Utility, there are various Mac
imaging applications , those are capable for creating image of
specific volumes along with the complete drive. 
There is a one famous Mac Cloning and Imaging application that I am using is Stellar Drive Clone. This software allows you to create image of boot volume in both Minimal Installation mode and with default or desired selected installed applications. Once this process is completed, one can burn this image to DVD in order to make a bootable alternative for his Mac.
There is a one famous Mac Cloning and Imaging application that I am using is Stellar Drive Clone. This software allows you to create image of boot volume in both Minimal Installation mode and with default or desired selected installed applications. Once this process is completed, one can burn this image to DVD in order to make a bootable alternative for his Mac.
Make sure to
save this image at a secure location, like an external drive or a
network drive. It is necessary to keep an updated image of your boot
volume in order to revert to the latest running state of Mac.
Steps to
Restore Mac
with Image:
You can use your Mac boot volume image to restore Mac with Disk Utility or tool like Stellar Drive clone.Follow the steps discussed below:
- Insert Mac OS X install disc and restart your Mac.
- Press and hold C key in order to boot from Mac install disc.
- Choose your preferred language.
- Launch Disk Utility.
- Go to ‘Restore tab' in right hand pane.
- Select your external drive in the left hand pane, and then image file.
- Now, drag image file to the ‘Source’ field.
- Drag disk to restore image on ‘Destination’ field.
- Click Restore button, then click OK.
After the
restore process finished, eject OS X install disc. Now, you can boot
normally.
No comments:
Post a Comment
To make your comment live kindly pay attention :-
Don't include spam words and
Don't give links in your comments.